PostgreSQL Timescale DB
Installation in Ubuntu
Installing Timescale DB following the documentation here
Checked the ubuntu version on the
Dellmachine and if postgreSQL is already installed.No LSB modules are available.
Distributor ID: Ubuntu
Description: Ubuntu 20.04.6 LTS
Release: 20.04
Codename: focalpavan@gqc-Inspiron-N5110:~$ psql --version
psql (PostgreSQL) 15.2 (Ubuntu 15.2-1.pgdg20.04+1)Since
postgreSQLis present, removed it before moving onto installing TimescaleDB.sudo apt-get --purge remove postgresql postgresql-*
sudo reboot nowInstall
PostgreSQL TimeScale DBsudo apt install gnupg postgresql-common apt-transport-https lsb-release wget
/usr/share/postgresql-common/pgdg/apt.postgresql.org.sh
echo "deb https://packagecloud.io/timescale/timescaledb/ubuntu/ $(lsb_release -c -s) main" | sudo tee /etc/apt/sources.list.d/timescaledb.list
wget --quiet -O - https://packagecloud.io/timescale/timescaledb/gpgkey | sudo apt-key add -
sudo apt update
sudo apt install timescaledb-2-postgresql-14sudo timescaledb-tuneSetup
timescale DBStart
psqlsudo apt-get update
sudo apt-get install postgresql-client
sudo systemctl restart postgresql
sudo -u postgres psqlSetup the password for the user
posetgresnotePassword used here is
postgres\password postgres # Enter your password to the prompt that comes up\q
Connect to
postgreSQLthrougpsqlclient and setuptimescaleDBpsql -U postgres -h localhostCREATE database tsdb;
\c tsdb
CREATE EXTENSION IF NOT EXISTS timescaledb;Verify the
timeseriesDBby\dx
Finally you can connect to the DB via,
psql -U postgres -h localhost -d tsdb
Migrating from TDEngine to TimescaleDB
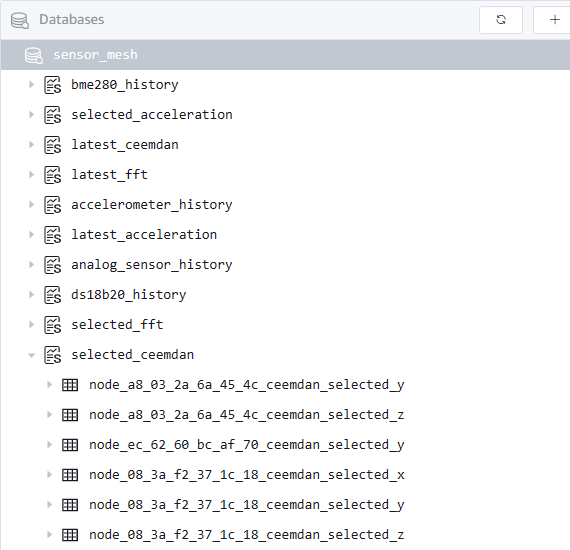
Existing table schema in TDEngine
Sensor_mesh DB:
Collimator DB:
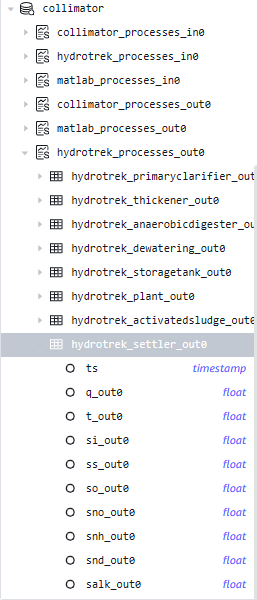
Hydrotrek supertable and Collimator supertable are the same. Collimator tables were not deleted after they were renamed to Hydrotrek from the notebook.
Steps for deepvibe timescale DB
Clone
git@github.com:gqc/deepvibe-api-drf.gitCreate a separate virtual env:
conda create -n deepvibe-api-drf python=pythonActivate the virtual environment created above.
Install the requirements by
pip install -r requirements.txtModify the
psqlport to 5433.- Open
/etc/postgresql/14/main/postgresql.confand replace theport=XXXXwithport=5433 - Restart
psqlservice bysudo service postgresql restart
- Open
Start postgreSQL
sudo systemctl restart postgresql
psql -U postgres -h localhost -p 5433
Create a copy of
settings.pyaslocal_settings.pyand add your database details into it. For my case it was:# Database
# https://docs.djangoproject.com/en/4.2/ref/settings/#databases
DATABASES = {
'default': {
'ENGINE': 'timescale.db.backends.postgresql',
'NAME': 'deepvibe',
'USER': 'postgres',
'PASSWORD': 'postgres',
'HOST': 'localhost',
'PORT': '5433'
}
}Run migrate script.
python manage.py migrateCreate super user
python manage.py createsuperuserI used
postgresas the username andpostgresas the password.Verify the table creation.
- Start
psqlbypsql -U postgres -h localhost -p 5433 \listwill list all the databases.\c deepvibewill connect to thedeepvibeDB.\dtwill list the tables.
\d accelerometer_historywill show the table details.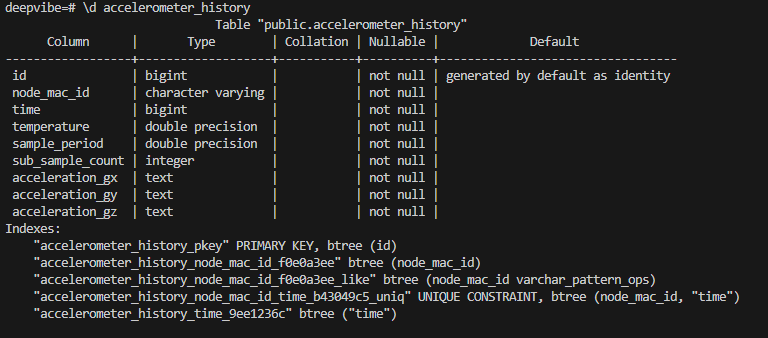
- Start
Notes
(01/30/2024) Pavan
Notes on the timescale db integration with deepvibe server. The psql server is setup locally on the
Ubuntu Dellmachine and all the testing is done on the local network.
- The
deepVibeserver changed to work with PostgreSQL timescale DB is present on thetimescale_dbbranch in the repo. - The new interface is present in the files,
timescaleDB_interface.candtimescaleDB_interface.h - deepVibe server is communicating with the REST endpoint,
deepvibe-api-DRF, usingCURL - I've created a generic,
post_to_deepvibe_API_DRF()function, which takes in the endpoint address and a dictionary of fields, which are constructed through respective write to table functions. - The
timescale DBis accessed fromGrafanadashboard.- Install postgreSQL plugin if not already installed.
- Add a new datasource to connect the
timescale DBinstance. Make sure to ticktimescale-dbfield during the process. - In the dashboard, once you pick the postgreSQL as the datasource, the panel selectors will change from pure SQL to field based selection and we can set up queries as required.
- Existing dashboard json file is present as
grafana_dashboard_for_timescale_db.jsonin the repo undertimescale_dbbranch. You may import that file as a new grafana dashboard to begin with.
When working with grafana cloud, postgreSQL endpoint needs to open access to all the possible addresses grafana might be accessing data from. Jake had done this before during a test. Can raise security questions.
(12/12/2023) Jake
- If you make model changes, you will need to run
python manage.py makemigrationsfirst to generate the migration files. python manage.py migrate is used to apply migration files to the database. - This repository is the API. If you run the app using
python manage.py runserver, you can try calling the endpoint: localhost:8000/api/example But it will return an empty set. - I was working on setting up a production server for this API on one of the office machines.
(12/10/2023) Jake
Then Django steps:
- Virtual env
- pip install
- Create empty database (deepvibe)
- Create local_settings.py and reference your specific database
- python manage.py migrate
- python manage.py createsuperuser