New OCR Pipeline [2023]
- Information on tools used here, like ffmpeg, can be found on general site.
05/04/2023
Dhananjay: Optical Character Recognition (OCR) is done on the images extracted from the CCTV pipe inspection videos to extract annotations from the pictures. The annotations include distance relative to the start of the inspection survey, pipe material, and PACP codes. The annotations extracted from the images are blurred to prevent the classification model from associating words with certain defect classes during training. The OCR output, along with CCTV inspection reports, are used to assign ground truth classes to each image.
This pipeline is based on full frame stitching (6 by default) + OCR
- Following are the steps we follow after getting a new dataset from a new utility. The
modulesI refer to are available as bothnotebooks(inhydrotrek@gqc.comdrive and ingqc-python-utilsrepo) andpython scripts(compute-canada repo) - Refer data location to know where the data is located.
- Refer data organization to view how the folders should be arranged.
Initializing folder structure for a new
Utility.- We name a
Utilityusing an all-caps tag likeDNV,SD1,METRO, etc. - In Google Drive of
hydrotrek@gqc.com, we create the folder structure for the newUtilityaccording to data organization
- We name a
Import data provided by the
UtilityFor more information on this step, refer this article.
- Create a shortcut folder and place the folder in
CCTV/<Utility>/Data/Uploaded_Data - Create a CSV file from each DB by which should contain following columns:
cross_reference_id: referenced name between the video file name and name in DBs (in different utility this can be called asJOBNUMBER,INSPECTION_ID,..etc)Distance: the location of defectContinuous: continuous defect columnCode: the defect codeValue_Percent: the value in percent. This is needed for water level model
- If utility has more than one DBs, concatenate multiple csv files into a single csv.
- Run zips-videos
- Use globtastic to get path to all the videos
- Create dataframe containing the
videofileandvideopathcolumns and save toCCTV/<Utility>/Data/Video_Lists/ - call function to zip the videos into the group of 10 by default into
CCTV/<Utility>/Data/Videos/and create a video list of each group and save toCCTV/<Utility>/Data/Video_Lists/
- Create a shortcut folder and place the folder in
Extract frames from videos of each group using
Extract framesmodule.Analyze the frames to mark the
distance bounding box, which is a rectangle capturing the location where distance is appearing in the video and classify each video based onvideo_typewhich is required if you want to extract bothdistanceanddefect code.- For doing either of the analysis we get help from
middle_frame_extractionmodule which saves a single frame from middle of each video to a disk. We can then load the images tostreamlitapps in the next two stages. - To identify the
distance bounding box, we use theDistance Region Extractorpage in streamlit basedcctv-app. - To classify based on
video_type, we use the Visualizer page in the streamlit basedcctv-app.
- For doing either of the analysis we get help from
Run Azure OCR on videos of each group using 'Stitch full frames + Azure OCR` module.
Run 'extract labels' module to extract
distanceanddefect codes from frames.Run
filter distancemodule to filter out noise and interpolate blanks in the distance outputs from the previous step.Run
blur framesmodule to blur all text fields in extracted frames.Run
label lookupmodule to match the frames with defect labels frommetadata csvfiles.
04/04/2023
This dataflow is based on image stitching and AzureOCR, which reduces Azure OCR requests by upto 160x. Moved back to full frame stitched OCR method because the bounding boxes for all text in the frame were still required for blurring text
New workflow with image stitching + AzureOCR
Shared with Vannary on 04/04/2023
Extract frames into zip files (done) (about 107 zips for 1066 wRC videos)
Azure OCR produces text and corresponding bounding boxes for the middle frames (done)
Frames are snipped from the standard extracted directory to extract the distance region in each middle-frame
- Deven created an app to find the distance region to snip the image using the middle frames (Here is a walkthrough on the app)
- Distance regions will be snipped from all extracted frames from the zip files based on the previous point. (Refer the snipping function example here to create a new snipping feature to your workflow:
- Organize the snips so that they are consistent with the extracted frames zip files (extracted snips directory - names of the zips should be identical).
Stitch 160 frames (maximum of 200 snips) at a time from the same video using ffmpeg to create a single file which would be sent to Azure OCR
- Find the text corresponding to each snip
- Process the text to find the distance and assign it to the corresponding frame
- Write a csv for each video for all the extracted frames (frame_id, distance)
- Group the csv files into zip files according to the original group
An example notebook is already present here.
Please refer to the notebook above and modify that to fit into the workflow.
The main function of the notebook has this format
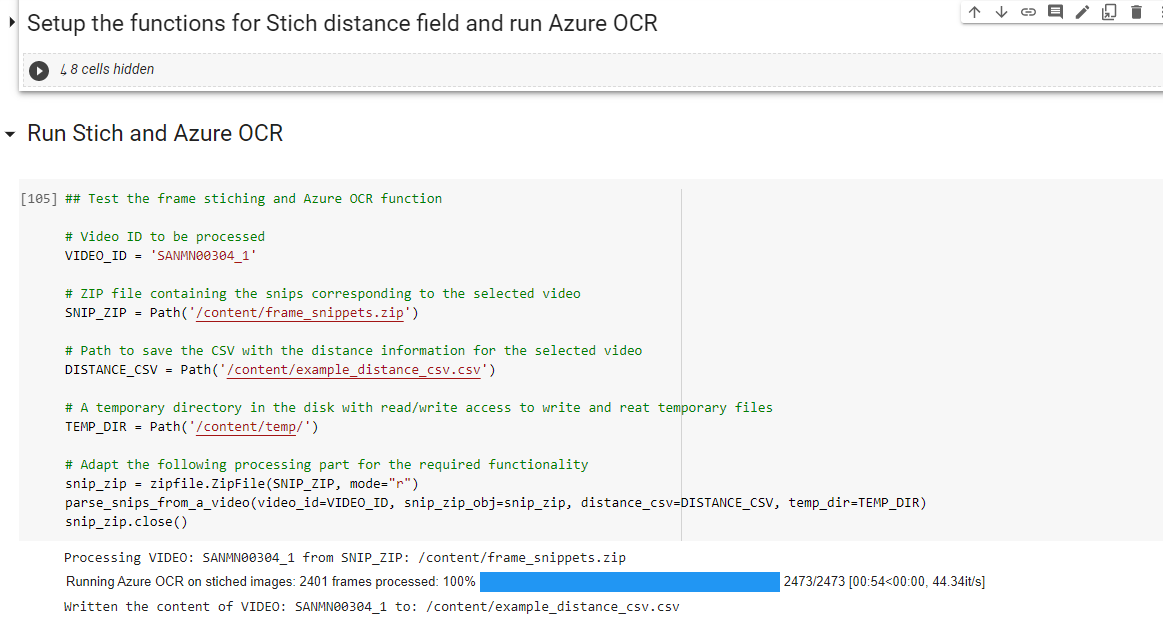
Assign defects to frames based on the distance from the Access DB
Explaination on the terms snips and stitching
Extracted from an email.
By Distance region, we refer to the area marked by the red square in the following example image. It can be different for different videos. To identify the pixel coordinates of the Distance region, we use the new tool in the streamlit app as explained in the point #3.i above.
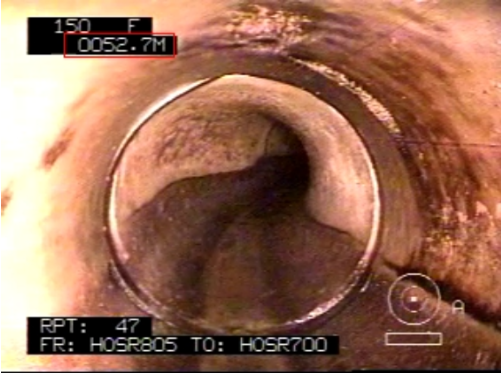
Then in #3.ii, we crop to the distance fields from all frames which results in snips created from all of the frames. An example for a snip would be:

In #4, the notebook we provided contains all the functions you need to process the snips you got in #3. You will have to modify it to fit them to the standard directory pipelines. For clarity, I'll try to describe the processing steps done in the notebook.
- For a given set of frames, it stitches the 'snip's together vertically, which would look like the following example. (For clarity I only added 5 snips together for this email, but in the real process it will stich 160 snips together vertically in a similar fashion)
- Then it sends the 'stitched' image to Azure OCR and gets the result. So, each OCR result will contain distance strings corresponding to 160 frames (or less, when we are processing the last few frames of a video)

- Then the distance string is run through regex and mapped back to the corresponding frame. Which essentially gives us the distance value for each frame.
- Then the data is saved to a CSV, just like before.