VS Email 03/20/2024
Sewer Image Classification Models
1. Original Data Location and Description
1.1. DNV
The original files uploaded by DNV are saved in the red Seagate external hard drive. a. The first 81 videos uploaded by Sean in 2022. “upload_2022” contains 81 CCTV videos and three access databases which contain the condition data (CCTV inspection reports) for each video. Deven had downloaded these files to GQC local computer.
b. CCTV videos and condition data uploaded by Sean in 2023. There are about 5238 videos and two dbf files, CCTV_Details (CCTV condition data) and CCTV_Headers (CCTV inspection information). Only 3427 out of 5238 videos have CCTV condition data stored in CCTV_Details.dbf. Deven had downloaded these files to GQC local computer. emailsc1
1.2. METRO
GQC only has 39 CCTV videos shared with them on Gdrive. The remaining videos are stored in black Seagate external drive. But extracted images, azure json, blurred images, and labels are shared with GQC on VS_Research/CCTV/METRO/Data/ directory on Gdrive.
1.3. COV
The original files sent by COV are stored in red Seagate external hard drive.
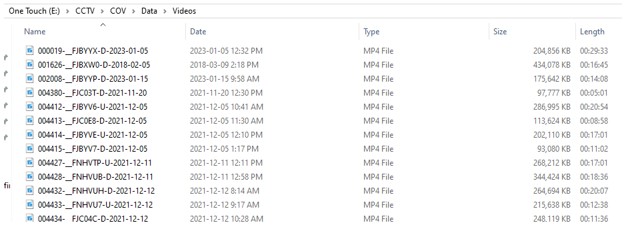
a. 92 Videos
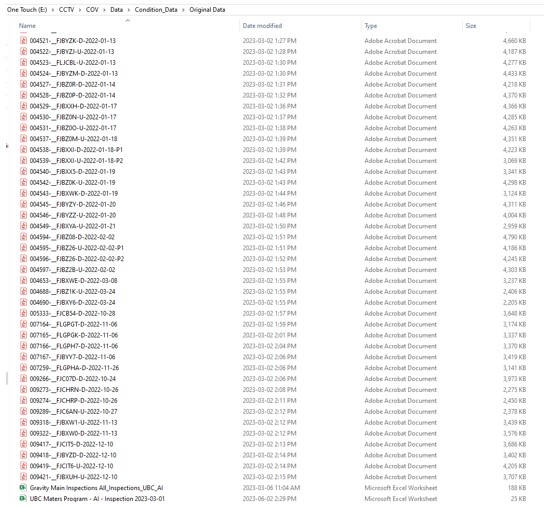
b. Condition data – COV sent CCTV inspection reports in pdf and excels format
2. Data Organization in Compute Canada and GDrive
2.1. Data Structure
- We organize data by different utilities, such as “DNV”, “COV”, and “METRO”
- We define the term
frame_idas<video_id>_<frame_index>where<video_id>is the name of the video without extension and<frame_id>is the zero-padded index of the frame consisting six digits. - We define the term
video_groupas<dataset_name>_<start_index>_<end_index>where<dataset_name>is the name we decided for the dataset,<start_index>and<end_index>are the indexes of the videos belonging to that dataset. (Order of the videos are decided by the default output ofPythonfastaiglobtasticfunction, which we use to scrape all the video files from the shared directory by the utility.) - We define the term
model_runidas<utility>-<dataset name>-GL(Grouped Labels)-C (include continuous defects)-spvidT (for Video-based model)<train&validation and test split>-<crossvalidation_set_file>-<backbone model>-<prT = use weight and bias from previous model; prF = use random weight and bias>-<e number of epochs>-<fe number of freezing epochs>-<augT = use image augmentation; augF= does not use image augmentation>-<weightT = The weights of classes are determined by the number of samples, with the rarest class having the highest weight; weightF = all classes weigh equally>-<number of GPUs>.
E.g.: dnv-791_v3-GL-C-80_20-cv0-resnet50-prT-e10-fe4-augF-weightF-4gpus
- Relative to the
project_path, such as in<projects/def-blence/vannary/CCTV>in Cedar and Narval clusters or<VS_Research/CCTV>in Gdrive, the folders are structured as follows:
CCTV/– the project root directory<Utility>/e.g. “DNV”, “COV, or “METRO”Data/Video_Lists/- csv files provide lists of videos grouped together in sets of 10-20 videos for efficient processing in a CCTV pipeline, and considering the limitations of file count in Compute Canada.<video_group_name>.csve.g:dnv_pacp_35_01_10.csv
Videos/- zip files containing the videos belonging to each list put underVideo_Listsdirectorycondition_data_csv/(DNV) orMetadata_CSV/(METRO) orcondition_data/(COV) - csv files provide the condition data corresponding to each video. Columncross_reference_idcontains the unique ID for each video. Additional csv file contains information that links video file name to the unique ID.dnv_pacp_A_81_condition_data.csvanddnv_B_C_condition_data_with_remarks_col.csvfor DNVmetro-all-videos-may-23.csvfor METROcov_combined_92videos_PACP_details_for_image_labelling.csv
Extracted_Frames/- Extracted Frames from the videos will be saved inside this folder under zip files. Each zip file will correspond to the video lists insideVideo_Listsdirectory and each zip contains extracted frames from all the videos within the list.unblurred_images_<video_group>.zipe.g.:unblurred_images_dnv_pacp_35_01_10.zip- Inside
unblurred_images_<video_group>.zip, there will beframe_id_1.png,frame_id_2.png, etc.
Extracted_CSV/- Zip files contain list of extracted frames from each video. Each zip file will correspond to the video lists inVideo_Listsdirectory and each zip will contain set of csv files corresponding to each video in the list.- Inside
csv_from_<video_group>.zipe.g.:csv_from_dnv_pacp_35_01_10.zip, there will bevideo_id_1.csv,video_id_2.csv, etc.
- Inside
Azure_JSON/- Zip files contain Azure OCR results for each frame. Each zip file will correspond to the video lists inVideo_Listsdirectory and each zip will contain Azure ORC results for each frame in.jsonformat.JSON_<video_group>.zipe.g.:JSON_dnv_pacp_35_01_10.zip- Inside
JSON_<video_group>.zip, there will beframe_id_1.json,frame_id_2.json, etc.
Blurred_Frames/- Extracted frames from videos with all text fields blurred will be saved inside this folder under zip files. Each file will correspond to the video lists insideVideo_Listsdirectory.Training_Frames_<video_group>.zipe.g.: `Training_Frames_dnv_pacp_35_01_10.zip.- In order to save time on unzipping all the zip files, I created a tar.gz file which contains all blurred frames used to train models for each utility
dnv_791_train.tar.gzfor DNVcov_92_train.tar.gzfor COVmetro_1561_JPG_train_1.tar.gzfor METRO
Filtered_Extracted_Data_CSV/(In Compute Canada) orLabels_CSV/(In GDrive) - Zip files contain theExtracted_data_<video_group>.zipFiltered_Extracted_data_<video_group>.zip
Labels_CSV/(In Compute Canada) orLabelled_Images_CSV/(In GDrive) – csv files used to train and test the models.train_val_<dataset name>_FB_<version#>_<cross_validation_set>.csv- csv files used to train and validate frame-based modeltrain_val_<dataset name>_VB_<version#>_<cross_validation_set>.csv- csv files used to train and validate video-based modeltest_<dataset name>_FB_<version#>.csv- csv files used to test frame-based modeltest_<dataset name>_VB_<version#>.csv- csv files used to test video-based model
Training_CSV/- Outdated Folder
outputs/(Only in Compute Canada)training_runs/- zip files contain saved models in .pkl and .pth format and wandb files.<model_runid>-models.zip: contains models that are saved for every two epochs.<model_runid>output.zip: contains models saved at the last epochs in .pkl and .pth format<model_runid>wandb.zip: contains wandb files saved offline. This is needed to be extracted and upload to wandb website.
prediction_runs/- zip files contain model results after running model on test data.<model_runid>-pred_probability_test_images.csv<model_runid>-pred_true_vs_predict_test=<test_csv_file>.csv
models/- saved models in .pkl and .pth are saved in this folder after unzipping the zip files found inoutputs/directory. Formodels/in GDrive, saved models are transferred from compute Canada to Gdrive using rclone. Each model is saved under its<utility>subfolder.cctv-multilabel-<model_runid>.pkl or .pth- model of one-stage approachcctv-singlelabel-<model_runid>.pkl or pth- Stage 1 model of two-stage approachcctv-defect-multilabel-<model_runid>.pklor.pth– Stage 2 model of two-stage approach- Data Preparation Notebooks
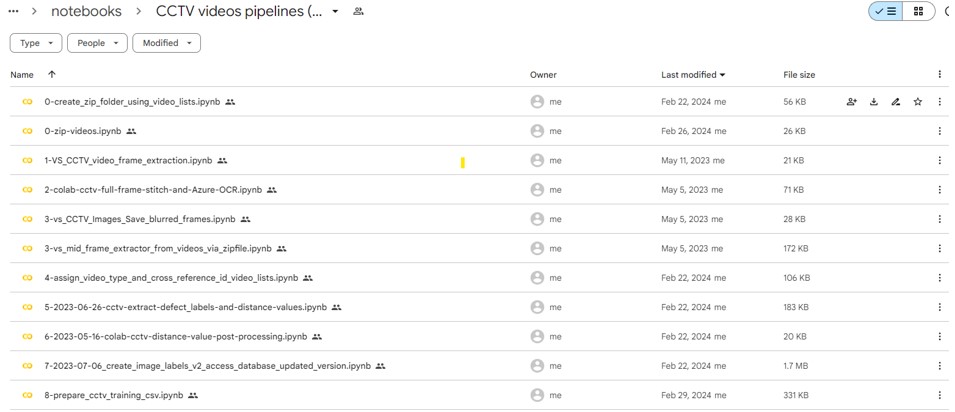
Notebooks that were used to create labels are located in relative to
<VS_Research/CCTV/notebooks/CCTV videos pipelines (paper 1)>in Gdrive
3. Data Preparation Notebooks
Notebooks that were used to create labels are located in relative to <VS_Research/CCTV/notebooks/CCTV videos pipelines (paper 1)> in Gdrive
4.Step-by-step training and testing process via Compute Canada
- Create virtual environment on your cluster (cedar or narval). This is a one-time step.
a. Go to your desired directory. cd $HOME/projects/def-blence/vannary/CCTV
b. Load version of python that you want. module load python/3.8
c. Create your virtual environment. Insert your virtual environment name in place of<Virtual Env Name>.
virtualenv<Virtual Env Name>
d. Activate your virtual environment. source<path_to_Virtual Env Name>/bin/activate
e. Install necessary library using pip install. e.g.:pip install fastai
f. requirements_multi_gpu.txt (you can find the copy of it in section 6 of this document) has the list of libraries that are necessary to train the model. You can txt file to install all the libraries using the following command:pip install --no-index -r requirements_multi_gpu.txt - Use the following shell files for:
- shellrunner_multi_gpu.sh to train an image classification model on the Narval cluster using up to four gpus.
- shellrunner_single_gpu_cedar.sh to train an image classification model on the Cedar cluster using only one gpu.
- shellrunner_prediction.sh to run prediction on test images using one-stage approach model.
- shellrunner_two_stage_model_run.sh to run prediction on test images using two-stage approach model.
- To submit your job using shell file, you need to include the following command lines in your shell file:
#SBATCH --nodes=1           # number of nodes
#SBATCH --gpus-per-node=a100:4      # type of gpus and number of gpus
#SBATCH --ntasks=1
#SBATCH --cpus-per-task=48 # 34, 40
#SBATCH --account=def-blence        # your account
#SBATCH --mail-type=ALL
#SBATCH --mail-user=vannary@mail.ubc.ca # your email for notification
#SBATCH --mem=60G               # memory allocation
#SBATCH --time=5:00:00          # time allocation
Go to https://docs.alliancecan.ca/wiki/Running_jobs for more information 4. Compute Canada to run your job in the slurm temporary directory. Therefore, you will need to copy all your input files from your project directory to slurm temporary directory and copy all the output files from slurm temporary directory back to your project directory. It is important to make sure that all paths are input correctly. Input files:
module load python/3.8  # Load python
source $HOME/projects/def-blence/vannary/CCTV/multi_gpu/bin/activate # Activate your virtual environment
Unzip sewer_ml (contains .py files to train the model) to SLURM_TMPDIR
cd $SLURM_TMPDIR/sewer_ml/
Copy input files located in project directory to SLURM_TMPDIR
cp $HOME/projects/def-blence/vannary/CCTV/${utility}/Data/Labels_CSV/${image_csv}.csv $SLURM_TMPDIR/sewer_ml/
unzip $HOME/projects/def-blence/vannary/CCTV/github/model_weights/weights.zip -d model_weights
tar -xzf $HOME/projects/def-blence/vannary/CCTV/${utility}/Data/Blurred_Frames/${train_folder_name}.tar.gz
Output files:
Compress output files into zip files
zip -qr ${runid}_models.zip models/
zip -qr ${runid}_outputs.zip outputs/
Copy them to project directory
cp ${runid}_models.zip $HOME/projects/def-blence/vannary/CCTV/${utility}/outputs/training_runs/
cp ${runid}_outputs.zip $HOME/projects/def-blence/vannary/CCTV/${utility}/outputs/training_runs/
cp $SLURM_TMPDIR/sewer_ml/*.txt $HOME/projects/def-blence/vannary/CCTV/${utility}/outputs/training_runs/
- If you train your model on compute Canada and submit your job to Slurm directory, you can change your training setting in shellrunner_multi_gpu.sh and shellrunner_single_gpu_cedar.sh.
- Replace the second value of each line to your desired value. For example, you can replace <700> and <470> with your desired image width and height.
sed -i "s/IMG_HEIGHT = 576/IMG_HEIGHT = 470/" settings.py # Change from 576 to 470
sed -i "s/THRESHOLD = 0.5/THRESHOLD = 0.5/" settings.py # 0.3, 0.7
sed -i "s/IMG_TRANSFORM = False/IMG_TRANSFORM = False/" settings.py # True
sed -i "s/SHARPEN = False/SHARPEN = False/" settings.py # True
sed -i "s/SHARPEN_FACTOR = 50/SHARPEN_FACTOR = 20/" settings.py # 20
sed -i "s/WEIGHTED_LOSS = False/WEIGHTED_LOSS = False/" settings.py # True
sed -i "s/FOCAL_LOSS = False/FOCAL_LOSS = False/" settings.py # True
sed -i "s/RANDOM_WEIGHT = False/RANDOM_WEIGHT = False/" settings.py # True
sed -i "s/FREEZE_EPOCHS = 4/FREEZE_EPOCHS = 4/" settings.py # 1, 4, 10
sed -i "s/USE_fit_flat_cos = False/USE_fit_flat_cos = False/" settings.py # True
sed -i "s/LABELS_COL = 'labels'/LABELS_COL = 'group_labels'/" settings.py
- shellrunner_multi_gpu.sh and shellrunner_single_gpu_cedar.sh both can be used to train one-stage and two-stage approach. When you want to use these shell files to train the second model of the two-stage approach (i.e., model that is used to classify different defect types (exclude non-defect class) of predicted defective images), make sure to set NO_ND = True.
Original:sed -i "s/NO_ND = False/NO_ND = False/" settings.py
Modified:
sed -i "s/NO_ND = False/NO_ND = True/" settings.py
- cd to directory where your shell file is located using the terminal
cd projects/def-blence/vannary/CCTV/shellfiles/ - Enter the following command lines to submit your job using the terminal.
- To train one-stage approach model
sbatch --time=<time> --mem=<memory> shellrunner_multi_gpu.sh -s <name of training .py file> -r <run ID> -b <batch size> -e <number of unfreezing epochs> -i <name of training csv> -y <name of .tar file that contains blurred images> -u <utility> -g <number of gpus>E.g.: COV one-stage ResNet50 model- You can overwrite requested time and memory in shell file using --time and --mem.
- Name of training .py files
- fastai_multi_label_v3_multi_gpus for ResNet 50 model
- fastai_multi_label_v3_multi_gpus_resnet101 for ResNet 50 model
- fastai_multi_label_v3_multi_gpus_mobilenet for MobileNet V3 Large model
- The naming of run ID is described in point 4 of section 2.1.sbatch --time=1:00:00 --mem=40G shellrunner_multi_gpu.sh -s fastai_multi_label_v3_multi_gpus -r cov-74_v2-GL-C-80_20-cv0-resnet50-prT-e10-fe4-augF-weightF-4gpus -b 32 -e 10 -i train_val_cov_74_SS_CB_FB_v2_0 -y cov_92_train -u COV -g 4 - To train the first model of the two-stage approach
sbatch --time=<time> --mem=<memory> shellrunner_multi_gpu.sh -s <name of training .py file> -r <run ID> -b <batch size> -e <number of unfreezing epochs> -i <name of training csv> -y <name of .tar file that contains blurred images> -u <utility> -g <number of gpus>E.g.: DNV binary classification ResNet101 model (first mode of the two-stage approach)- Name of training .py files
- nd_vs_defect_v1_multi_gpus for ResNet 50 model
- nd_vs_defect_v1_multi_gpus_resnet101 for ResNet 50 model
- nd_vs_defect_v1_multi_gpus_mobilenet for MobileNet V3 Large modelsbatch --time=6:00:00 --mem=40G shellrunner_multi_gpu.sh -s nd_vs_defect_v1_multi_gpus_resnet101 -r singlelabel-dnv-791_v3-C-80_20-cv0-resnet101-prT-e10-fe4-augF-weightF-4gpus -b 32 -e 10 -i train_val_dnv_pacp_791_FB_v3_0 -y dnv_791_train -u DNV -g 4 - To second model of the two-stage approach
- When you want to train the second model of the two-stage approach (i.e., model that is used to classify different defect types (exclude non-defect class) of predicted defective images), set NO_ND to True in the shellrunner_multi_gpu.sh.
Original:
sed -i "s/NO_ND = False/NO_ND = False/" settings.py
Modified:
sed -i "s/NO_ND = False/NO_ND = True/" settings.py
- Run the following command line.
sbatch --time=<time> --mem=<memory> shellrunner_multi_gpu.sh -s <name of training .py file> -r <run ID> -b <batch size> -e <number of unfreezing epochs> -i <name of training csv> -y <name of .tar file that contains blurred images> -u <utility> -g <number of gpus>
You can overwrite requested time and memory in shell file using --time and --mem.
Name of training .py files
- fastai_multi_label_v3_multi_gpus for ResNet 50 model
- fastai_multi_label_v3_multi_gpus_resnet101 for ResNet 50 model
- fastai_multi_label_v3_multi_gpus_mobilenet for MobileNet V3 Large model
E.g.:
COV defect classes only multilabel classification ResNet50 model (the second model of the two-stage approach)
sbatch --time=1:00:00 --mem=40G shellrunner_multi_gpu.sh -s fastai_multi_label_v3_multi_gpus -r defect-multilabel-cov-74_v2-GL-C-80_20-cv0-resnet50-prT-e10-fe4-augF-weightF-4gpus -b 32 -e 10 -i train_val_cov_74_SS_CB_FB_v2_0 -y cov_92_train -u COV -g 4
To run one-stage model on test data
sbatch --time=<time> --mem=<memory> shellrunner_prediction.sh -s fastai_multi_label_prediction_with_labels_GQC_metric -r <run id>-pred -t <test csv> -m <model_name > -y < name of .tar file that contains blurred images> -u <utility>- Edit the following line in your shell file if your model is located in the different directory.cp {model_name}.pkl $SLURM_TMPDIR/sewer_ml/ E.g.: sbatch --time=4:00:00 --mem=60G shellrunner_prediction.sh -s fastai_multi_label_prediction_with_labels_GQC_metric -r jpg-metro-1334_v2_small_dia-GL-C-80_20-cv0-resnet50-prT-e10-fe4-augF-weightF-4gpus-pred -t jpg_test_metro_1334_small_dia_SS_CB_FB_v2 -m cctv-multilabel-jpg-metro-1334_v2_small_dia-GL-C-80_20-cv0-resnet50-prT-e10-fe4-augF-weightF-4gpus -y metro_1561_JPG_train_1 -u METRO
To run two-stage model on test data
- Make the following modifications to shellrunner_two_stage_model_run.sh
- Enter the command to copy your first model of the two-stage approach slurm directory E.g.:
cp $HOME/projects/def-blence/vannary/CCTV/models/cctv-singlelabel-jpg-metro-1334_v2*.pkl $SLURM_TMPDIR/sewer_ml/
cp $HOME/projects/def-blence/vannary/CCTV/models/cctv-singlelabel-dnv-791_v3*.pkl $SLURM_TMPDIR/sewer_ml/
cp $HOME/projects/def-blence/vannary/CCTV/models/cctv-singlelabel-cov-74_v2*.pkl $SLURM_TMPDIR/sewer_ml/
- Input the name of your stage 1 model (first model of the two-stage approach) in the settings.py by replacing the green highlighted part with the name of your model in the shell file. E.g.: Change from 'cctv-singlelabel-combined-692-C-80_20-resnet50-prT-e10-fe10-augF-weightF-4gpus' model to 'cctv-singlelabel-jpg-metro-1334_v2_small_dia-C-80_20-cv0-resnet50-prT-e10-fe4-augF-weightF-4gpus' model Original version: sed -i "s/STAGE1_MODEL = 'cctv-singlelabel-combined-692-C-80_20-resnet50-prT-e10-fe10-augF-weightF-4gpus'/STAGE1_MODEL = 'cctv-singlelabel-combined-692-C-80_20-resnet50-prT-e10-fe10-augF-weightF-4gpus'/" settings.py
Modified version: sed -i "s/STAGE1_MODEL = 'cctv-singlelabel-combined-692-C-80_20-resnet50-prT-e10-fe10-augF-weightF-4gpus'/STAGE1_MODEL = 'cctv-singlelabel-jpg-metro-1334_v2_small_dia-C-80_20-cv0-resnet50-prT-e10-fe4-augF-weightF-4gpus'/" settings.py
- Run the following command line.
sbatch --time=<time> --mem=<memory> shellrunner_two_stage_model_run.sh -s cctv-multi-label-two-stage-approach_GQC_metric -r <run id>-pred -t <test_csv> -m <second model name> -y < name of .tar file that contains blurred images > -u <utility>E.g.: METRO ResNet50 two-stage approach model for pipes with small diameter (less than or equal to 750 mm) sbatch --time=4:00:00 --mem=60G shellrunner_two_stage_model_run.sh -s cctv-multi-label-two-stage-approach_GQC_metric -r two-stage-defect-multilabel-jpg-metro-1334_v2_small_dia-GL-C-80_20-cv0-resnet50-prT-e10-fe4-augF-weightF-4gpus-pred -t jpg_test_metro_1334_small_dia_SS_CB_FB_v2 -m cctv-defect-multilabel-jpg-metro-1334_v2_small_dia-GL-C-80_20-cv0-resnet50-prT-e10-fe4-augF-weightF-4gpus -y metro_1561_JPG_train_1 -u METRO - Wandb syn to website
- Create a txt file contains the path of wandb.zip with respective to the directory containing the wandb_upload.sh file. (<projects/def-blence/vannary/CCTV/wandb_syn/)
- Activate environment that contains wandb library.
sh wandb_upload.sh <name of txt file from step 1>- Requirements_multi_gpu.txt
You can create the txt file by copying the below contents into a .txt file.
accelerate==0.16.0
anyio==3.6.2+computecanada
appdirs==1.4.4+computecanada
argon2-cffi==21.3.0+computecanada
argon2-cffi-bindings==21.2.0+computecanada
asttokens==2.2.1+computecanada
attrs==22.2.0+computecanada
backcall==0.2.0+computecanada
beautifulsoup4==4.11.2+computecanada
bleach==6.0.0+computecanada
blis==0.7.5+computecanada
catalogue==2.0.8+computecanada
certifi==2022.12.7+computecanada
cffi==1.15.1+computecanada
charset-normalizer==3.0.1+computecanada
click==8.1.3+computecanada
comm==0.1.2+computecanada
contourpy==1.0.7+computecanada
cycler==0.11.0+computecanada
cymem==2.0.7+computecanada
debugpy==1.6.6+computecanada
decorator==5.1.1+computecanada
defusedxml==0.7.1+computecanada
docker-pycreds==0.4.0+computecanada
executing==1.2.0+computecanada
fastai==2.7.11
fastcore==1.5.28
fastdownload==0.0.7
fastjsonschema==2.16.3+computecanada
fastprogress==1.0.3+computecanada
fonttools==4.38.0+computecanada
gitdb==4.0.10+computecanada
GitPython==3.1.31+computecanada
idna==3.4+computecanada
importlib-metadata==6.0.0+computecanada
importlib-resources==5.12.0+computecanada
ipykernel==6.21.2+computecanada
ipython==8.11.0
ipython-genutils==0.2.0+computecanada
ipywidgets==8.0.6
jedi==0.18.2+computecanada
Jinja2==3.1.2+computecanada
joblib==1.2.0+computecanada
jsonschema==4.17.3+computecanada
jupyter-client==8.0.3+computecanada
jupyter-core==5.2.0+computecanada
jupyter-events==0.6.3+computecanada
jupyter-server==2.3.0+computecanada
jupyter-server-terminals==0.4.4+computecanada
jupyterlab-pygments==0.2.2+computecanada
jupyterlab-widgets==3.0.7
kiwisolver==1.4.4+computecanada
langcodes==3.3.0+computecanada
MarkupSafe==2.1.2+computecanada
matplotlib==3.7.0+computecanada
matplotlib-inline==0.1.6+computecanada
mistune==2.0.5+computecanada
murmurhash==1.0.9+computecanada
nbclassic==0.5.2+computecanada
nbclient==0.7.2+computecanada
nbconvert==7.2.9+computecanada
nbformat==5.7.3+computecanada
nest-asyncio==1.5.6+computecanada
notebook==6.5.2+computecanada
notebook-shim==0.2.2+computecanada
numpy==1.24.2+computecanada
opencv-python==4.5.1.48+computecanada
packaging==23.0+computecanada
pandas==1.5.3+computecanada
pandocfilters==1.5.0+computecanada
parso==0.8.3+computecanada
pathlib==1.0.1+computecanada
pathtools==0.1.2+computecanada
pathy==0.10.1+computecanada
pexpect==4.8.0+computecanada
pickleshare==0.7.5+computecanada
Pillow==9.4.0+computecanada
Pillow-SIMD==9.0.0.post1+computecanada
pkgutil-resolve-name==1.3.10+computecanada
platformdirs==3.0.0+computecanada
preshed==3.0.8+computecanada
prometheus-client==0.16.0+computecanada
prompt-toolkit==3.0.38
protobuf==4.21.12
psutil==5.9.4+computecanada
ptyprocess==0.7.0+computecanada
pure-eval==0.2.2+computecanada
pycparser==2.21+computecanada
pydantic==1.8.2+computecanada
Pygments==2.14.0+computecanada
pyparsing==3.0.9+computecanada
pyrsistent==0.19.3+computecanada
python-dateutil==2.8.2+computecanada
python-json-logger==2.0.7+computecanada
pytz==2022.7.1+computecanada
PyYAML==6.0+computecanada
pyzmq==25.0.0+computecanada
requests==2.28.2+computecanada
rfc3339-validator==0.1.4+computecanada
rfc3986-validator==0.1.1+computecanada
scikit-learn==1.2.1+computecanada
scipy==1.10.1+computecanada
send2trash==1.8.0+computecanada
sentry-sdk==1.16.0
setproctitle==1.3.2+computecanada
six==1.16.0+computecanada
smart-open==6.3.0+computecanada
smmap==5.0.0+computecanada
sniffio==1.3.0+computecanada
soupsieve==2.4+computecanada
spacy==3.2.2+computecanada
spacy-legacy==3.0.12
spacy-loggers==1.0.4
srsly==2.4.5+computecanada
stack-data==0.6.2+computecanada
terminado==0.17.1+computecanada
thinc==8.0.13+computecanada
threadpoolctl==3.1.0+computecanada
tinycss2==1.2.1+computecanada
torch==1.13.1+computecanada
torchvision==0.14.1+computecanada
tornado==6.2+computecanada
tqdm==4.64.1+computecanada
traitlets==5.9.0+computecanada
typer==0.4.2
typing-extensions==4.5.0+computecanada
urllib3==1.26.14+computecanada
wandb==0.13.10
wasabi==0.10.1+computecanada
wcwidth==0.2.6+computecanada
webencodings==0.5.1+computecanada
websocket-client==1.5.1+computecanada
widgetsnbextension==4.0.7
zipfile36==0.1.3
zipp==3.15.0